In Engage, you can build selections to drill into your data, run counts on given criteria, and pull out and segment this data, to be used in campaigns or to build cross tabs and pivots. You can also export your selections to a tag or an external file.
Building a selection
-
Click the create (+) icon in the navigation pane to open the create menu and choose selection from the element list.
-
In the properties pane, set your table to the level at which your data is held, e.g. select individual for data held at the individual level.
-
Click and drag nodes from the available elements toolbar to begin building your selection logic. Nodes are split into two categories:
- Input Nodes are used to bring data into your selection.
- Operation Nodes are used to combine, merge, and manipulate your data.
-
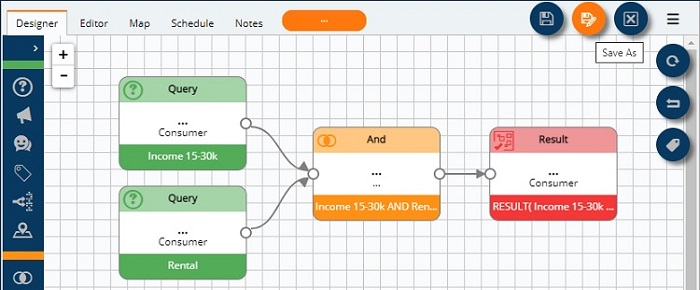
Join the nodes to build your selection.
-
In the properties pane, expand the build options and choose how your selection will be built, e.g. select build on refresh to have your selection results calculate whenever the selection is refreshed.
-
Expand the hamburger menu and select save as.
-
Give your selection a name and choose where you want to save it. The system defaults to the analysis folder.
-
With the selection saved, expand the hamburger menu and click the refresh button to view your selection data. The final count and result your selection will return is defined in your result node.
Note: you can rename nodes by clicking on the node, to switch from selection to node options in the properties pane, and providing a new name.
Exporting a selection
If you need to export a selection to a text channel:
-
Open the selection.
-
With the selection canvas selected, go to the properties pane and expand the export options.
-
Choose your output channel and define how your output file is named.
-
Save your changes.
If you need to save the data within your selection as a snapshot in time, you can export the results to a tag.
-
Build and refresh your selection.
-
Expand the hamburger menu and select export to tag.
-
In the popup window, either:
-
Choose the name and save location for a new tag, or,
-
Select an existing tag and choose to append, overwrite or delete data.
Note: tags are not the same as saved selections.
-
A saved selection is the rule(s) used to identify a group records, i.e. if your data changes, so will the records.
-
A tag is a snapshot of records at a certain time, i.e. a group of records with a certain tag will remain in that group even if the source data changes.
-